Each image file format comes with its own pros and cons. Some professionals might prefer one format, while others may find another format to be extremely useful. It‘s hard to define the best image format, as all of them serve different purposes.
Whether you are just another user who is interested in using up a new photo as a desktop background or someone who is professionally involved with capturing, as well as processing photos, you must think of a way to get rid of duplicate photos. The duplicate cleanup is very easy and simple, and the costs of ignoring it are very high! So clean the duplicate photos by using PictureEcho without wasting any more time.
PictureEcho is a verified software | Download it NOW
Compatible with Windows 10, 8 & 7 | View the Terms of Service
See PictureEcho blog for more details
If your aim is to simply share photographs with your friends and family, you may find JPG to be useful. It preserves image quality to an acceptable level and takes less space. If your work involves logo designing, high-quality graphics designing, PSD and AI formats may be more relevant to you.
Popular Image Formats
Images are commonly classified into different file formats, some of which are given below:
TIFF
TIFF is an abbreviation of Tagged Image File Format. Any images stored in this format are uncompressed, which is why they typically occupy a larger storage space than other image formats. Your images may sometimes contain additional data, which may not be relevant to you at the cost of slower loading. These files are used in popular image editing software like Adobe Photoshop, and page layout software Quark.
TIFFs are extremely flexible in terms of color patterns. They can be gray-scale, CMYK for printing publications, and even RGB for Web content.
JPEG
JPEG stands for Joint Photographic Experts Group, which is one of the popular image formats not only used in computers, but also smartphones, digital cameras, and other electronic devices.
The information stored in this file format is compressed to reduce the file size to a greater extent. As a result of smaller size, these images are easily loaded and allow your digital camera to store more photos on the SD Memory card.
One of the drawbacks of JPEG files is that the compression of the information can, at times, negatively impact and cause loss of original image quality. This is because your system deletes some data during the compression event. JPEG is less likely used for logo designing and graphics designing work.
GIF
GIF (Graphics Interchange Format) retains all information related to the file, causing its size to be a considerable value. GIF is especially used for animations on the Web as it offers a wider range of color patterns. However, it is not a good format for printing and photography.
PNG
PNG is short for Portable Network Graphics which is an open file format. This image type was basically developed as an alternative to the GIF due to copyrights issues.
PNG offers compression benefits along with a whole range of different color varieties. This format is widely used on the Web, animation industry and is a preferred file format for creating images with texts and line arts. This is the default file format in Mac when you capture a screenshot.
Raw Image Files
As the name implies, any images created in this file format are unprocessed in nature. These files are most often created by traditional digital cameras. In order for the application to modify, color correct an image, etc, raw images need to be converted into other file types, preferably, TIFF.
PSD
PSD (Photoshop Document) is the default file format for Adobe Photoshop. It contains various types of information including layers, image designs.
This is a proprietary file format developed by Adobe Inc. and can also be used with Windows Photo Viewer, Windows Media Centre and other third-party image editors with the use of right codecs.
It is also possible to view files created in this format using Apple Preview, an in-house functionality in the Mac. One drawback of this format is it does not support vector graphics designing.
EPS
EPS is the abbreviation of Encapsulated Postscript. Unlike the PSD file format, EPS supports vector designing which is quite useful for printing high-resolution graphics without compromising at all on the image quality.
This file format is universally supported by almost all modern graphics designing software programs. Images stored in this format can be easily shared with anyone and opened on almost all supporting electronic devices.
AI
AI stands for Adobe Illustrator Document. Adobe Illustrator is an industry standard application for professional-quality logo designing and creative artwork. You can create and modify vector artworks in AI format. It is considered as one of the finest and reliable image file formats around the globe. It is commonly used on the Web, for printing and other purposes.
INDD
INDD (Adobe InDesign Document) is used in Adobe‘s InDesign application. It is widely used by professionals for drafting newspaper content, digital publications including e-books and magazines. It also supports merging existing content from Adobe‘s family software such as Photoshop and Illustrator.
Converting the Images to Another Format Without Downloading Third-Party Software
Windows PowerShell is an advanced and powerful command-line application in Windows. It is designed to provide seamless scripting experience to system administrators. It can automate various Windows administration tasks and the execution of Windows Server applications.
This tool can be quite helpful especially in batch converting image files. With just a few commands, you can save your images in a different directory in a new file format.
Take this as an example. If you have a folder full of JPG image files, you may use the Windows PowerShell program to bulk convert the entire folder contents to an entirely new format such as PNG. One added benefit of this conversion will be that it saves a lot of time and involves lesser interaction on the part of the user. You won‘t have to open each file in your image editor every time to convert it. Mere execution of a customized script allows bulk-conversion of files.
While working with PowerShell, it is important to take adequate care. Wrong commands, typos can throw system exceptions and errors. In extreme cases, typing incorrect commands can cause your system to become unstable and wipe out your important data. If you‘re a beginner, consider creating a new Restore Point and backing-up important data before playing around with the PowerShell application.
Procedure
- Click on the Start button on the Taskbar, and type PowerShell.
- Right-click on the PowerShell entry, select Run as administrator.
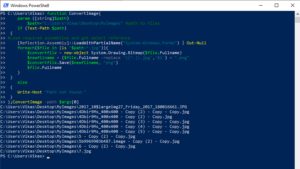
- Customize the following command (see the section right after the script) and then press Enter to execute it.
function ConvertImage{
param ([string]$path)
$path=”C:\New” #path to files
if (Test-Path $path)
{
#Load required assemblies and get object reference
[Reflection.Assembly]::LoadWithPartialName(“System.Windows.Forms”) | Out-Null
foreach($file in (ls “$path\*.jpg”)){
$convertfile = new-object System.Drawing.Bitmap($file.Fullname)
$newfilname = ($file.Fullname -replace ‘([^.]).jpg’,’$1′) + “.png”
$convertfile.Save($newfilname, “png”)
$file.Fullname
}
}
else
{
Write-Host “Path not found.”
}
};ConvertImage -path $args[0]
In the command given above, we’ll need to specify appropriate source directory, target directory, existing file extension and desired target extension. Here’s how:
A) Specify Image Source
In the following line, you’ll have to insert the address of the folder that contains the image files.
- $path=”C:\New” #path to files
B) Specify Existing & Desired Image Extension
In the four separate lines given below, replace .jpg with the existing image extension and .png with the desired new extension.
- foreach($file in (ls “$path\*.jpg“)){
- $convertfile = new-object System.Drawing.Bitmap($file.Fullname)
- $newfilname = ($file.Fullname -replace ‘([^.]).jpg‘,’$1’) + “.png“
- $convertfile.Save($newfilname, “png“)
Finally, execute the customized query and wait for Windows to process the images. This process might take a considerable amount of time depending on the size of each file and the available free memory.
Scan Converted Image Files for Duplicate Content
Once all the files have been successfully converted to the new format, it is important to check for duplication. Regularly cleaning duplicate files will lead to an improvement in system performance and help cut down on the time it takes you to dig out important files.
PictureEcho helps scan for duplicate images and sweep them with great ease. It is a purpose-built software, is light on system resources, performs its job swiftly, and will always come up with perfect results.
PictureEcho not only scans duplicate images, but it also contains a mode for scanning images that are very similar to each other and are occupying storage space for no good. This mode is known as the Similar Scan and is further divided into 4 modes. However, more on it in some other blog post since it is well outside the scope of this article.

PictureEcho makes the whole job easier due to its no-nonsense interface. The interface is very simple and straightforward. And the whole process involves adding up the target scan location(s), selecting the scan mode, launching the scan, selecting the duplicates once the scan is over and finally, choosing between permanent deletion and moving the duplicates to a folder.
- Download PictureEcho from its website and install it.
- Launch the program and click the Add Path button to select the target scan location.
- Click OK to add the target scan location. You can add up as many locations as you want.
- Now select the Exact Match radio box and then click Start Search to launch the scan.

Setting it up for the Exact Match scan - When the scan is over, you can check out the footer of the PictureEcho user interface to find out the number of duplicates detected as well as the storage space they’re occupying.
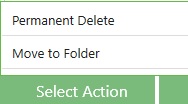
- Now click the Select Duplicates button to choose uniform criteria to select the duplicates.
- Finally, click Select Action and choose between Permanent Delete and Move to Folder.
The Final ACT!
The latest release of PictureEcho has also made it possible to restore any files which you’ve mistakenly moved to a folder. Just click the History button and click Restore for the respective scan entry.

