The PhotoStick is a neat innovative bit of invention that is a tiny USB drive and might not seem to be so useful to a random observer. That is until they go on to find out the huge benefits it offers. Even though it is optimized for storing various media files on it, essentially the PhotoStick can be used to back up virtually any kind of file.
Remember the annual family Christmas dinner of 2010? Remember the “first-time” specials of your first child Zoe in this world? There must have been many more memory treasures like these saved in your computer in the form of stashes of photos. Sounds good, but what about duplicates? Why waste storage space on photos that aren’t needed? Why cause all that clutter to build up? Use PictureEcho and cleanup an unlimited amount of duplicate photos in a secure manner.
PictureEcho is a verified software | Download it NOW
Compatible with Windows 10, 8 & 7 | View the Terms of Service
See PictureEcho blog for more details
How about backing up these images? The abrupt death of the hard disk or a venomous virus is enough to trash away these memories. And you surely don’t want to let that happen. How do you take preventive measures? You purchase a PhotoStick that fits your budget and needs, and back it up with all the important bit of data.
A wide range of PhotoStick devices is available for computers as well as the most popularly used smartphones of these days. This means that this device will have no compatibility issues should you ever switch from a Windows-based system to a Mac, or from an iPhone to an Android-powered one. The biggest PhotoStick you can get for a smartphone is 64 GB, and for a computer/ laptop, a staggering 1 TB!
We’ve covered the benefits PhotoStick offers and the circumstances that might lead one to go for it in sufficient detail. Now let’s switch to the problem at hand.
Duplicate Photos in the PhotoStick
If you were to backup photos to the PhotoStick, a day will come when duplicates will find a footing sooner or later. Duplicate data has become a reality today and cannot be ignored. You can follow the best practices like keeping your data organized neatly, but even that does not assure you of a duplicate free database forever.
This leaves us with only 1 option of having a way out to deal with duplicates. The manual way is doable, and a decent solution if you’re dealing with a few dozen images at max. However, if you were to come across a PhotoStick device littered with duplicates here and there, you will be left with no room for the manual solution at all.
This means you can either go for a reputed third-party solution or employ the in-house duplicate preventing option provided by PhotoStick. Let’s look at both of these in some detail.
The Native Functionality
This feature is designed to prevent the copying of duplicate images into the PhotoStick on a then and there basis. Basically, the PhotoStick app will scan your entire computer and copy all the images into a single location on the PhotoStick USB. If it encounters any duplicates during the process, it only copies the oldest image and simply disregards the others. You can easily setup the PhotoStick app to do the needful.
- Simply plug in the PhotoStick device and install the app.
- Now launch the PhotoStick app.
- Navigate to the ThePhotoStick Settings and Options section and open up the Options tab.
- Select the radio box for Consolidate all files into a single directory.
- Also, select the checkbox for Skip duplicates.
Sounds all good? But how about slightly modified versions of an image file that have been marked as duplicates and so PhotoStick app won’t copy them. You surely won’t be happy to find this out if you’re a pro graphics designer, professional photographer etc. Also, how exactly does the app determine 2 images to be duplicate? Does it only take into account the filename or it actually examines the images as well? This is a really crucial one. Let’s head to our next solution that will satisfy you on all ends.
PictureEcho
This software program is a 1-stop solution for dealing with all kind of duplicate images. It totally disregards the image name, and entirely focuses on the actual images to decide if they are duplicate images, similar images or aren’t related at all. Simply navigate to its website and download the software to put it to good use. Now install the extremely light on system resources program and put the uber-intelligent mechanism of PictureEcho to the ultimate test.
- Launch the program and click the Add Path button to add up the folder/ drive which you want to scan for duplicate images. You can add up as many paths as you want to be included in a single scan.
- Now click the Exact Match radio box and hit Start Search to launch the scan.
- Once the scan is over (which will happen very soon unless you’ve gathered a whole lot of images), the footer of the PictureEcho user interface will be showing up duplicate images detected during the scan and the storage space they were occupying.
- Click Select Duplicates and choose which kind of image from each duplicate group you want to retain (e.g. smallest, biggest, high resolution, low resolution, newest, oldest, by folder location).
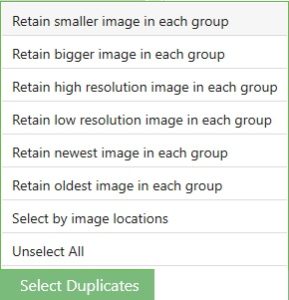
The Select Duplicates menu - Finally, click Select Action and choose between Permanent Delete (purging them forever) and Move to Folder (backing up the images to a folder of your liking).

The Select Action menu
This software will launch a comprehensive scan on a huge quantum of images and come up with an absolute degree of accurate results in no time. It is capable enough to include virtually all kinds of image formats under the sun, which is again a big plus point specifically appealing to professionals.
Once you’ve been assured that your image collection is duplicate free, you can happily copy all the images to your PhotoStick device with the satisfaction that you’re only copying genuine and duplicate free images and not even a single kB on your PhotoStick device is being poorly utilized to store duplicate images. Have a good day folks!

