Cloud services are becoming increasingly popular for their numerous advantages. Cloud services are beneficial to individuals and businesses in some way or another. Personal users are able to store their photos and files online, and share them with their friends. Businesses can store large amounts of data at a reasonable cost. Employees can work in a team in real time, and benefit from file versioning and other similar features.
Why Do Some Businesses Switch From pCloud to Dropbox Business?
pCloud is a Swiss-based service. Its major selling point is customer’s privacy. pCloud gives emphasis on privacy and security by offering end-to-end encryption and other privacy-friendly features. You can store your files in a Crypto folder where your files are encrypted from the client-side. If something goes wrong while you’re editing your files, you can still use the versioning feature to get the original file version back.
Some businesses may not need all of these features. Some businesses prioritize file collaboration and team working over extended security. If your business is one of them, Dropbox Business can be a great alternative.
Dropbox Business makes team collaboration easier by giving file sharing permission features. If you’re using Microsoft Office or Google Workspace, you can create and edit documents, presentations, worksheets, or share them easily. The platform offers native support for Microsoft’s productivity suite.
But this isn’t to say that Dropbox Business doesn’t have advanced security features. You get some security features such as Single Sign-On, 2FA and file sharing permissions. Moreover, Dropbox is the oldest cloud storage service, which is known for its security and reliability.
pCloud to Dropbox Business Transfer Process
Easy Cloud Manager has a simple Web interface. You can move files instantly, or schedule them. ECM gains temporary access to your cloud account, which you can revoke at any time.
ECM supports many popular cloud storage services including Dropbox, Dropbox Business, OneDrive, OneDrive for Business, Google Drive, Google WorkSpace, Box, pCloud, etc. It’s easier to add a new account, and remove it. You can also explore the contents of your cloud account, and batch rename/ batch dedupe them with a few clicks.
Steps
- Visit the Easy Cloud Manager website: https://easycloudmanager.com/
- Create a new account for free, and sign-in to your account.
- Click on the Home tab.
- In the Add Cloud Drives tab, select pCloud.
- You’ll be asked to provide file access permissions. Follow the on-screen procedure.
- Similarly, click on the Dropbox Business.
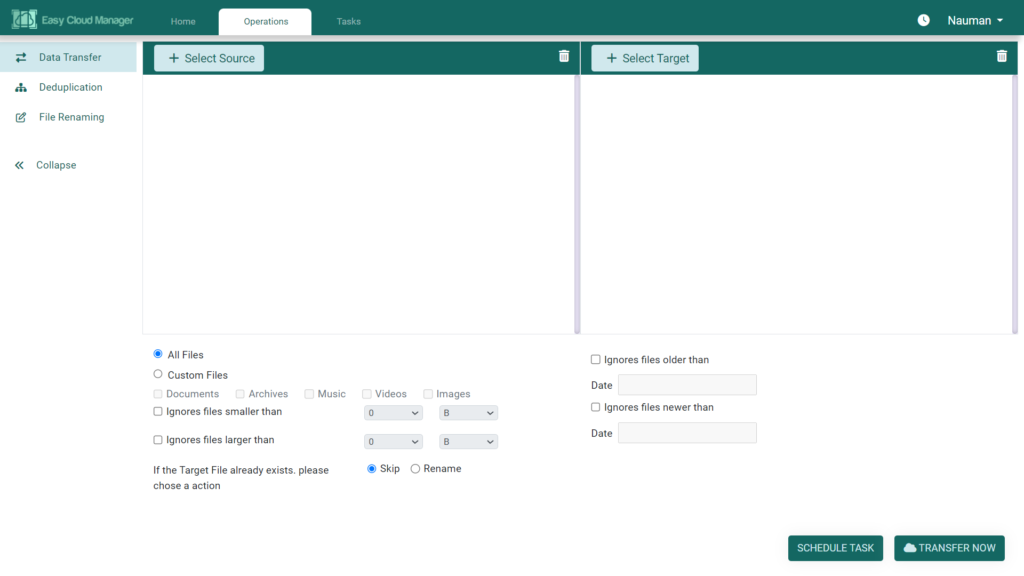
- Click on the Operations tab.
- Click on Data Transfer > Select Source.
- Select the source folders from where you want to move the files.
- Click on Select Target.
- Select the destination folder where you want to paste the copied files.
- Click on Schedule Task.
- Choose how you want to schedule the transfer (for example – once, daily, weekly, or monthly)
- Specify the date-time, and then click on Schedule Task. If you don’t want to schedule, click on the Transfer Now button instead.
Is EasyCloudManager Secure?
It’s 100% secure. ECM uses the official API method provided by your cloud services to access and manage your files. This is the most secure and customer privacy-friendly method to manage your files.
Manual Method
The two-step manual method involves downloading files from pCloud and uploading them on Dropbox Business. You can upload your files either manually, or using the Dropbox Business desktop app.
Step 1: Download Your Files
- Sign-in to your pCloud account.
- Open the folder containing your files.
- Check the files you want to download.
- Click on the Download icon.
- pCloud will prepare a .zip archive with your files. Once it is downloaded, you can open it using a freeware tool such as 7-Zip File Manager.
Step 2: Upload Your Files
Option 1: Upload Files Manually
- Extract the files from the downloaded Zip archive into a temporary folder (for example, C:\TempFolder)
- Sign in to your Dropbox Business account.
- Go to the folder where you want to upload your files.
- Click on the Upload button.
- Select the files you want to upload (in our example, files located in the C:\TempFolder). You can select multiple files once. To do so, select the first file in sequence. Press and hold the Shift key. Select the last file in sequence.
- Click on Open.
- Your file upload will start. You must keep your browser on until all files are successfully uploaded.
Option 2: Upload Files Using Dropbox Business App
- Download Dropbox Business app.
- Sign-in to your Dropbox account.
- Open your Dropbox folder.
- Go to the destination folder where you want to upload your files.
- Extract the files from your downloaded archive to upload them.

