One of the most basic yet annoying problem in our lives (especially those of us who are obsessed with taking photos) is the headache to manage and organize our tons of photos, and while we are at it, the dilemma to delete the duplicated ones among the whole stock makes it more complicated.
Almost every one of us has taken a lot of photos on different occasions of life. Also, there are photos stored across different devices, like a computer, cell phones, cameras and it gets quite difficult to keep them well organized when they are in a huge quantity.
Similarly, the thought of deleting an enormous amount of duplicate photos stresses people out. When we use any picture editing software like Adobe Illustrator, a lot of duplicate photos get created quite regularly.
What is Adobe Illustrator?
To create vector images, which is rather difficult in Photoshop, Adobe has created another platform called Adobe Illustrator. The product is specifically designed to create artwork, logos, banners, and other promotional drawings both in print and digital form.
The basic function of Adobe Illustrator is to create things without any restrictions of resolution or pixels depth. Creations from Adobe Illustrator are in vector form, which means that their size/ ratio can be changed without worrying about the image resolution.
Adobe Illustrator can also work with Photoshop, helping users to import and export files directly to and from Photoshop. Its updated versions have more features including realistic brushes and 3D imaging techniques.
Adobe Illustrator works with Windows and Mac operating system. The main file format that Adobe Illustrator supports is .ai (Adobe Illustrator Artwork), which has been developed by Adobe Systems. Its main purpose is to open vector-based drawings in the EPS or PDF format.
Organizing the Photos
There are different ways to organize your photos in a well-ordered manner. If you want to minimize your burden of categorizing the never-ending stock of images, you have to be more structured. There are several steps to follow through which we can assemble our photos.
- First of all, find your photo collection from all storage devices and move it to a single location (preferably on your computer or an external hard drive)
- Now you can create an easy-to-understand structure for your entire photos collection. This can comprise of a master folder and several sub-folders (depending on the photos).
- Now you can rename the folders accordingly, e.g. Birthday Party, Annual Vacation etc. Another neat trick is to add the date in the dd-mm-yyyy format to the subfolder name.
Methods to Remove Duplicate Photos from Your Computer
Nearly every individual has a computer/ laptop that contains anywhere between a small-scale to a gigantic number of duplicates stashed on the hard disk. There are two methods to remove these duplicate photos.
Method 1: Manual Removal
The first method to remove duplicate images is the manual one. You will have to manually delete all the identical photos one by one by after digging them out. You can also select multiple photos by holding the Ctrl key while you click on each duplicate photo. Be warned that this process is a lengthy one so you will have to be super patient while you’re on it. This method is only recommended if the number of duplicate photos is not that big, or else you run the risk of pushing yourself into a never-ending process.
These are the simple steps involved in the manual procedure:
Step 1: Open up the storage drive.
Step 2: Move all the photos to a single location so that you can easily compare them for duplication.
Step 3: Now you have to trust your grit and compare all the images to visually spot all the duplicates. This promises to be a huge ask, so be prepared in advance.
Step 4: The job of selecting the images can be done in either of the following 2 ways. If the images are in succession, you can simply use the Shift + left mouse click combination, or if they are found after some intervals, use the Ctrl + left mouse button combination to simply ignore the images between the last selected image and the current one.
Step 5: Hit Shift + Delete to signal permanent removal of the duplicate photos.
Step 6: Click Yes in the confirmation prompt.
This method is plagued by several limitations and is only reliable if the number of duplicate photos involved isn’t a big one.
Method 2: Using PictureEcho
PictureEcho is a computer duplicate photos finder used to locate identical as well as similar pictures on your storage drives. Whether it is just your random selfie, an old image from a family reunion or a highly detailed photo of your DSLR (available for Exact Match only), PictureEcho is intelligent enough to scan them all and help you rid yourself of duplicate photos. It is currently available for only Windows and runs on it’s 10, 8.1, 8 and 7 versions.
How does this software pull off this magic? Well, PictureEcho uses an advanced algorithm which detects duplicate photos on your storage device. Once you rid the storage of the duplicate photos, you can bring about substantial improvement in the way your photo collection is organized.
Sounds really cool. So this is how you can do it all.
Step 1: First of all, download the PictureEcho setup from https://www.pictureecho.com/download/ and install it.

Step 2: Launch the program and click Add Path to add as many folders/ hard drives/ external drives which you want to scan for duplicate photos. You can even add the folder which contains Adobe Illustrator’s photos.
Step 3: Now select the Exact Match option, from the farther end of the user interface.

The reason for selecting this option is that if you select the other option (Similar Match), the software will derive results for all the images that can be classified as similar. Duplicate images are quite different from similar images.
Step 4: Now click the Start Search button to begin the scan.
Step 5: After the scan is over, all the duplicates that have been detected during the scan will be joined into groups (with each group containing all the corresponding duplicates), and listed out in the user interface.
Also, the footer will be displaying extremely handy information such as the total duplicates detected as well as the storage space lost to them.

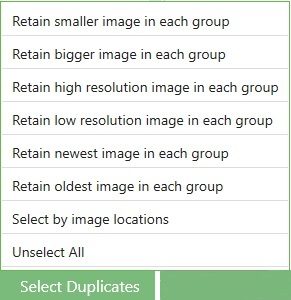
Step 6: Now you have to choose which photo from each duplicate group will be retained. You can either do so manually by clicking the relevant checkboxes in the user interface, but this option will tire you to hell if the number of duplicate groups is too big. So the more sophisticated way is to click the Select Duplicates button and choose an option of your choice to signal which type of duplicate you want to retain from each duplicate group.
Step 7: In the last step, click the Select Action option and then select Permanent Delete for complete removal of the duplicates.
PictureEcho makes detecting and deleting duplicate photos very easy. The whole process is super intelligent, so you don’t lose even a single genuine photo by mistake. And these steps ensure you can carry out the entire exercise without facing any issues at all.

