Sony Personal Content Station is a storage hub for your images and videos. It acts as a network hub where you can store the interesting moments of your life and quickly share them with your loved ones through social media, email, and other means.
Sony Personal Content Station enables one touch transfer through a modern technology called as Near Field Communication (NFC). If your smartphone or tablet does not support this feature, you always have an option to transfer your data through traditional means such as Wi-Fi, USB cable and memory cards. The primary role of this device is to make it easy and fun to manage your data across multiple devices including smartphones, tablets and computers.
The added advantage of Sony Personal Content Station is it works as a backup platform for the content stored on your Android and iOS operating systems. The price of this device offering 1 Terabyte of storage space is around $299.
The device supports various file formats including JPEG, RAW and MPO image file types, AVCHD, MOV, 3GP, MPEG1, MPEG2, MP4 and AVI video file types. In addition to this, you can convert your content to the MP4 file format on the go.
Sony Personal Content Station Doesn’t Include Support To Fix Duplication Of Files
Yes, you read it right. It has no in-house feature or an algorithm to detect duplication of your image and video files.
Fortunately, there is a way to deal with this problem of duplication. However, it requires you to first move all your content onto a computer. Here’s how:
- Plug in your Sony Personal Content Station to a computer running Windows operating system. Wait for some time for the computer to recognize the Plug and Play device driver.
- Create a new folder on your Desktop, and name it as MyFiles.
- Move all the stuff including images and videos from your Content Station to the MyFiles folder.
- After all files are successfully moved, open up your browser and download the Picture Echo software from here: https://pictureecho.com
- Install and run the program.
- Click on the Add Path the left corner of your screen.
- In the folder browser, select the target directory that contain your duplicate data. Here, in our case it’s C:\Users\UserName\Desktop\MyFiles.
- If you have two or more directories, repeat the above Step # 5-6 over and again for each of the items.
- Once all the relevant folders are selected, you will need to select a Similarity Criteria. Similarity Criteria is the basis on which Picture Echo finds duplicate files. Here are the predefined similarity criteria:
- Similar Match: If your aim is to find maximum number of duplicate files and free-up a large storage space, Similar Match should be your choice. When selected, Similar Match omits minor differences between image files such as background, color pattern, border shapes, etc.
- Exact Match: On the contrary, the Exact Match scan criteria looks for absolute identical content. That is to say, it displays only those files that have absolutely no differences. It is important to understand that each of these criterias have their own pros and cons. If you are a photographer frequently making edits to your images, you may find Similar Match criteria extremely helpful.
- Next, click on the yellow colored Start Search button. The scan should take place.
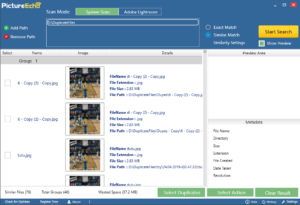
- After accumulations of the results, make sure that the Show Preview box is checked up. The in-house preview functionality will allow you to compare and see the content of each file without needing to go the target directory and open each file. This can save a lot of time, and help review results at a single glance.
- You can manually review the results and check each file you want to move/ delete.
- If you are running out of time, you may want to use the Select Duplicates button. It automatically selects all duplicates based on a predefined criteria of your choice. Some of them are given below:
- Retain newest files in each group: This option keeps all newer versions of your files and deletes/ moves the older ones. Use it if you’ve made modifications to your photos and would like to retain those changes.
- Retain oldest files in each group: As the name describes, it keeps all older file versions and gets rid of the newer items.
- Select by image location: You may use this option to mark files from a specific directory with the intention to move/ delete it. The Unmark option allows you to keep the file.
- Deselect all: This unmarks all files. You may either use it to keep all duplicates, or select them afresh.
- Retain high resolution images in each group: It is said that higher the resolution, better will be the image quality. You may choose this option to retain all better quality images in each group and move/ delete those with relatively lower quality.
- Retain low resolution images in each group: This keeps all relatively lower quality images in each group. Low resolution images may occupy relatively smaller size and can be easily shared on the Web.
- Select smaller images in each group: If you’re concerned about the disk space, you would want to keep all smaller sized duplicates and delete/ move the larger ones.
- Select bigger images in each group: This allows you to retain bigger images and move/ delete smaller ones.
- Click on the Select Action button and choose one of the following options:
- Permanently Delete: This will move all the selected images permanently. This action cannot be undone. It is strongly recommended to review all files before choosing this option.
- Move to Folder: This is the recommended option. You can move all duplicate versions to a folder of your choice, and review them before deleting them permanently.
- Once you’ve gotten rid of unwanted duplicates, you’ll want to move all the files from the MyFiles folder to the Sony Personal Content Station.
- After you’re done, safely unplug the USB cable. To do so, click on the upward arrow on the bottom right corner of your Taskbar, click on the Safely Remove icon and select your device.
Why PictureEcho?
PictureEcho is a powerful duplicate image scan utility. It provides a set of features to detect popular image files stored in different file formats such as JPG, JPEG, PNG, BMP, GIF, and many more.
The powerful scan engine built using the MD5 Hash functionality enables searching your photos at lightning speed and guarantees impressive accuracy. Your search results are displayed in different groups based on common MD5 Hash Code.
You can also add folders to the the Ignore List. This way you can save time and eliminate unwanted scan results. If you have Adobe Lightroom software installed, PictureEcho can be a great help optimizing its catalogue for duplicate entries.

