Nowadays external hard drives are often used by people to carry their data as they provide a secure medium compared to cloud drives. These drives are fairly cheap and compatible with virtually every device, such as computers, mobiles, and digital cameras. These devices are commonly used to store photos as well. With the advancement of technology in file storage, nowadays they come in a couple of terabytes, and thus the size of a photo is fairly large as well. Large files not just take a significant amount of space in the file storage, but also take a significant amount of time to be transferred. External hard drives often utilize USB technology to connect with many devices, and thus the speed is affected by a variety of factors.
This article teaches how to leverage existing resources to speed up the photos transfer process to an external file storage.
Solution 1: Enable Write Cache on USB Drives
Write Cache causes Windows to temporarily store data in the RAM before writing them to the storage. Enabling Write Cache improves the performance as it reduces the waiting time of the storage device.
Open up This PC.
Plug the USB storage to the computer, and wait until Windows detects it.
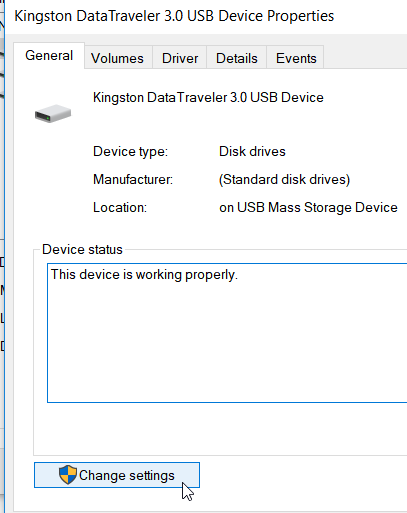
Right-click the USB icon and select Properties.
In the window that opens up, click the Hardware tab and locate the USB storage drive.
Double click it, and then open the Properties window of the USB storage device as shown below. Next, click the Change settings button.
Switch to the Policies tab, and then select the Better performance option.
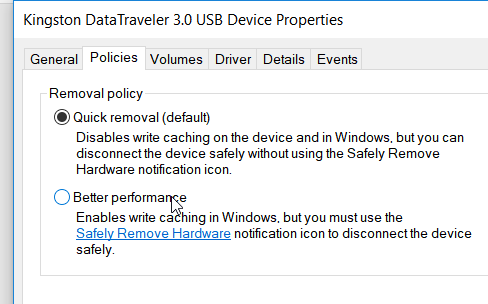
Click OK to save the changes and close all the windows you had opened in the previous steps.
Solution 2: Create a ZIP file to store photos
In Windows, a large number of small files are copied slower than a small number of large files. This means it is a neat trick to make a large file out of small files (compress them) helps fast track the process. However, this is only useful if there are thousands of small images, otherwise there is no use of following this solution. This solution requires 7-Zip or any other file compression tool. This guide uses 7-Zip as it is free and open source. You can also use any other solution of your choice.
Select all the images you want to use for creating an archive, and right click on them.
Point to the 7-Zip entry and select Add to archive from the list.
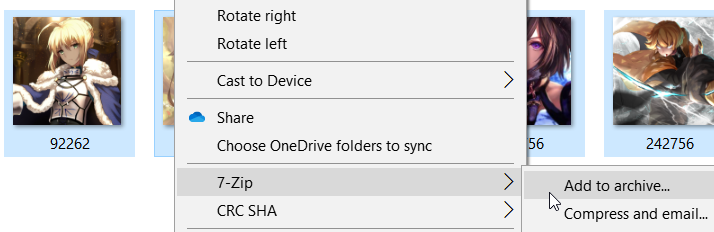
Select zip from the Archive format drop-down menu and Store in the Compression level option. Click OK to initiate the zip archive file creation. The zip file will be created in the same folder where the images are located.

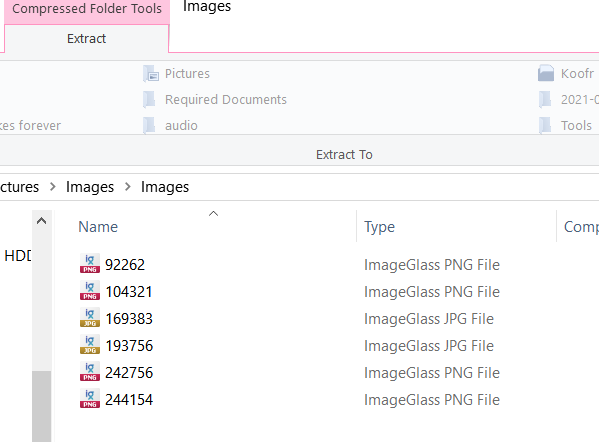
Copy the zip archive to the USB device. Now locate the zip archive, right-click it, point to Open with and select Windows Explorer.
Windows will show all the images in the File Explorer window as seen in the following screenshot.
Solution 3: Use USB 3 port instead of USB 1/1.1/2
USB-A 3, and USB-C or in short USB 3 port helps in transferring data much quicker compared to older USB 1 and 2 ports. So it is a wise move to plug the USB jack into the USB 3 port if your USB device supports the USB 3 port. In PC, USB-A 3 port is marked in blue color, but in newer computers, especially laptops all the USB A ports are USB 3, and therefore plugging the jack into any port does the job.
Solution 4: Optimize Images Before Transferring
One of the variables that determines the performance in copying images is the size of the image. Large files take some time before they are copied while smaller ones get copied very quickly. Even though both JPEG and PNG file formats are often used for compatibility reasons, they aren’t that popular as there are newer file formats that take far less storage space. One such file format is WebP. Developed by Google to improve the page load time when the page has a large number of images, this image format can now be used in Windows PCs also. File Explorer also supports thumbnail view for this image format. Windows doesn’t support converting images to WebP format with its inbuilt tools; hence a third-party tool is required. This solution uses XnConvert as it not only converts any image format to WebP, but also supports bulk conversion as well.
Open up the XnConvert program.
Switch to the Input tab, and drag and drop all the images you want copied to the USB drive, to XnConvert’s Input tab.

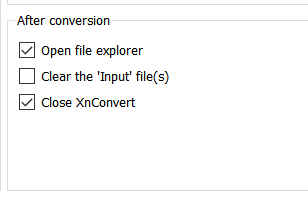
In the Format section, change the image format to WEBP – WebP. Also, in the After conversion section, select check both the Open file explorer, and Close XnConvert options.

Click the Convert button to start the conversion.
Once all the images have been converted, they will be stored in the same folder where the original images are located. This might make it difficult to locate the newer ones. Follow the steps given below to easily locate the WebP images.
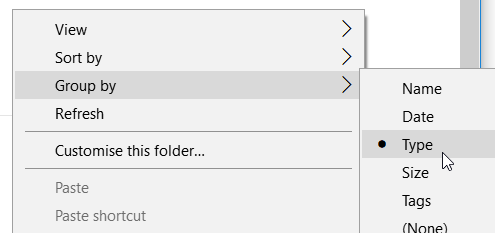
Right-click anywhere in the folder where the images are located, point to Group by and select Type to group the images by their image type.
Once the images are grouped, all the WebP images can now easily be located. Select all the images and copy them to the USB drive.

