Hard drives have become extremely cheap over time, and nowadays it’s quite common for people to own hard drives with a gigantic amount of space. Until and unless the hard disk gets filled to the brim, not many users bother to clear the mess.
The common file types that often eat up the space of any file system are images, videos, music files. Images are the single biggest culprit when it comes to occupying huge storage space, especially if they have been captured with a DSLR. This guide demonstrates some techniques to weed out junk images from your photo library in order to save space.
Solution 1
The first step involves figuring out whether it is really necessary to clear out the file system or not. If the hard drive has a gigantic amount of space, for instance, 1 TB, a photo library of 2 GB shan’t bother the user with clearing out the hard drive in most circumstances. In this case, the user can initiate the clearing process to remove any unnecessary junk files that are occupying the storage space for no good. The following steps demonstrate how to weed out junk files from a particular partition of the hard drive in order to recover more space for the photo library.
- Search for the Disk Cleanup app in the Start menu.
- Select the partition where the junk files are located.

- Select all the checkboxes, and then click OK to initiate the cleanup process.
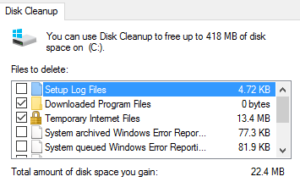
Select all the checkboxes for junk file types
Solution 2
Removing duplicate files is a simple task when it comes to using tools that are inbuilt in Windows. Some of the widely used tools for such purposes are Command Prompt and Windows PowerShell. The following steps demonstrate how to get it done with the given command in PowerShell.
Please be advised that PowerShell is a powerful tool that shouldn’t be used without any technical knowledge. A single wrong move can wipe out even the whole hard drive.
- Note the location of the photo library.
- In the PowerShell console, type the following command to navigate to the folder through the console.
cd “C:\Users\%username%\Documents\Test” - Now type the following command to remove the duplicate image files from the file system. The following command contains the most common image formats. However, you can easily add more formats at the end of the image format list by adding a space, an asterisk, and the period.
ls -include *.jpg,*.jpe,*.jpeg,*.jfif,*.png,*.tif,*.tiff,*.gif,*.dib,*.bmp,*.ico -recurse | get-filehash | group -property hash | where { $_.count -gt 1 } | % { $_.group | select -skip 1 } | del
Solution 3
The PowerShell solution is quite handy in removing duplicate files, but it doesn’t allow advanced customization options. It also requires the user to be well equipped with how all the commands have to be typed in. This leaves big room for an app that is user-friendly and allows the user to do it all with minimal input and no technical know-how at all.
PictureEcho does exactly what is required. It is an intelligent third-party app, that helps the user to eradicate duplicate images as well as visually similar images. It can remove images by size, resolution, data, location, and so is a highly preferable option compared to PowerShell.
- Download PictureEcho from its website and then launch the setup to install it.
- Select the System Scan tab. Now click Add Path to add up the exact path where the photos library is located.
- Now choose between the Exact Match and Similar Match radio boxes. If you select Similar Match, be sure to click the Similarity Settings link to select 1 of the 4 scan modes. The Show Preview option helps in displaying the preview of the selected image within the PictureEcho user interface. It’s quite useful to check the images with ease to decide whether to keep them or not.

Launching the scan - When everything is in the right order, hit Start Search to initiate the scan. The time it takes to scan the computer depends on the size of the photo library, the speed of the hard drive, and the speed of the processor (CPU). Having a faster processor, and an SSD hard drive is quite ideal in speeding up the scan time.
- Once you get the list of all duplicates that have been detected, you will have to select the photos for future action. Simply click the Select Duplicates button, and then pick one option that suits your needs.

Applying the criteria to retain duplicates - The final step is to hit Select Action, and then opt for either permanently deleting the duplicate photos or move them to a folder of your choice, if you think you might just need them in the future. Either way, your photo library is now in a neat and organized shape.

