Vector Graphics differ from normal images as they use polygons. There are x-axis and y-axis in each vector image that define specific positions in proportions. Straight lines and curves are integral parts of these images. Other attributes include shapes, stroke colors, fill colors, thick lines, etc. These images are not pixel-based.
Product Spotlight: Use PictureEcho to find and delete duplicate & similar vector images. Get it NOW!
Vector graphics are highly popular among folks involved with illustrative, object-oriented graphical jobs. Ever wondered how those small-looking organizational logos are scaled to fit roadside billboards? Unlike normal images, vector images are not made up of dots. Due to the nature of these images, they can be easily expanded without impacting the original quality of the image. You won’t notice distortion of the edges or any blowing effect. They offer the same quality even if you expand or shrink image size. Vector imaging software is used for drawing these types of images.
Finding Duplicates Using IrfanView
IrfanView is a popular freeware image viewer for Windows. It allows you to browse through your photo collection, batch rename files and do much more. It is more than a standard image viewer with added capabilities to edit pictures, change the canvas size, adjust color depth, adjust and sharpen colors, and replace color patterns. It also allows adding blur, oil paint, 3D button, explosion, and many other effects without requiring you to purchase a full-fledged premium photo editor.
Using IrfanView thumbnails, you can sort your files alphabetically to distinguish duplicates from original files. IrfanView, be design, is NOT a duplicate identifier tool.
Let us proceed to the actual procedure.
-
- Download IrfanView and double-click the setup file to install the program on your computer.
-
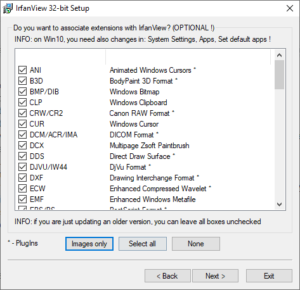
- During the installation stage, make sure to set IrfanView as the default image viewer for all types of image files. You can do so by clicking the Images Only button.
- During the installation stage, make sure to set IrfanView as the default image viewer for all types of image files. You can do so by clicking the Images Only button.
-
- IrfanView will create two shortcuts on your Desktop after successful installation- IrfanView and IrfanView Thumbnails. Launch the latter.
-
- Browse through the directories on the left to select the folder that contains duplicate vector images. Remember, IrfanView might take some time to load the images in the right-hand side panel and display them as thumbnails.

- Browse through the directories on the left to select the folder that contains duplicate vector images. Remember, IrfanView might take some time to load the images in the right-hand side panel and display them as thumbnails.
-
- Set the files to order by names. Click the Options menu, select Sort thumbnails | by Name (natural/ logic order).
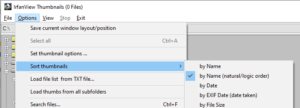
Sorting files alphabetically
- Set the files to order by names. Click the Options menu, select Sort thumbnails | by Name (natural/ logic order).
-
- Your files will be sorted by their names now. It will be much easier now to identify duplicates with file name patterns. Files with the text -Copy(1), -Copy(2), -Copy(3) are likely to be duplicated.
- Click on File, and select Delete selected files. Alternatively, you can use the Del key on your keyboard.

Deleting the selected files
Final words
Finding duplicate images with IrfanView has some inherent limitations. IrfanView as such is not a duplicate finder software. Therefore, you may have to browse through each folder in the left panel to manually identify duplicates. The process can be extremely tiring if you’ve got to go through a huge collection of images.
Finding Duplicates Using PictureEcho
PictureEcho is a leading duplicate photo finder software. It gives you immense control over folder selection and the way the scan is performed. Moreover, the results are grouped based on the similarity of the images to make it incredibly easier to review and fix them. PictureEcho comes with plenty of automatic file selection patterns so that you don’t have to manually select the images for onward action.
In the top header, you’ll be able to add folders to the scan. You can add new folders, remove existing ones and configure other scan settings. PE lets you choose one of the scan modes (Exact Match, Similar Match).
-
- Previews file contents.
-
- Amazingly fast and powerful scan algorithms. It allows the user to select a Similar scan level from the 4 options available in the Similarity Settings link.
-
- Move duplicates to another folder or delete them permanently.
-
- Plenty of file selection patterns that let you mark or unmark files with ease
-
- Custom selection using checkboxes.
-
- The context menu options let you open a photo file, containing folder, and the file properties dialog.
- The Exact match performs a pixel-to-pixel scan, the Similar match can find images that are visually identical in nature.
Steps
- Download PictureEcho and install it on your computer.

PictureEcho user interface - Click on Add Path and select the destination directory you want to search for duplicate vector images.
- You can also add more directories by repeating the same step.
- Choose one of the options from Exact Match and Similar Match. Exact Match looks for identical images, and Similar match scans for images that closely resemble each other but aren’t duplicates of each other.
- Click on Start Search and the program will start scanning your selected locations for possible duplicate vector images.
- Once the scan is finished, you’ll see image thumbnails with basic details about each file (such as file name, path, size).
- You can use the checkboxes to custom select the files to proceed (delete/ move to folder). Even better, use the automatic selection patterns in the Select Duplicates menu options. This option is quite useful if the scan has uncovered hundreds of thousands of duplicate files. PictureEcho offers the following file selection criteria:
- Retain the oldest file in each group
- Retain the newest file in each group
- Retain the smallest file in each group
- Retain the largest file in each group
- Retain the least modified files in each group
- Retain the most modified files in each group
- Retain images by folder location
- While reviewing the photos, you may want to check the detailed properties of a particular image or open it up. You can do so by right-clicking an image and selecting the respective option.
- Finally, click on the Select Action button and choose one of the following options:
- Delete permanently: Use this option to permanently delete the marked images. Any unmarked files will not be deleted.
- Move to folder: Use this option to move all marked files to a custom folder. This option is recommended so that you can recover any files, in case you change your mind.

