Shutterfly is a web-based service that provides image publishing and personalized gift facilities for its customers at affordable rates. Users can access the Shutterfly service using a host of devices from any location as long as there is decent Internet connectivity available. Shutterfly, unlike other image publishing services, doesn’t allow file synchronization, and therefore its difficult to synchronize uploaded images across multiple devices.
This article guides users on how to remove duplicate images from Shutterfly without getting involved in any high-fi or technically demanding methods. The first and foremost way out for you is to get a reliable software app to do all the hard work for you while you can sit back and relax. Get Clone Files Checker!
Clone Files Checker follows Google Software Principles
Solutions
Scenario 1: Duplicate Images in the Same Album
Getting rid of duplicate images in Shutterfly is a lot easier than with any other image publishing service due to its inbuilt hash checking feature. However, this feature is only available in the latest client-side software and its web-based upload manager, and the classical Adobe AIR based uploader isn’t equipped with the inbuilt duplicate file checking feature. So its highly recommended users update the client-side upload-manager to benefit from this amazing feature offered by Shutterfly. Its benefits are manifold, ranging from no clutter to an overall swift working experience as no duplicates are involved in the uploading of data.
- Navigate to the following URL and use the authentication information pertaining to your Shutterfly account to sign in:https://photos.shutterfly.com/add
- Locate the Get Desktop Uploader button, and click it to initiate the download.

Initiating the download - You can even download the Android and iOS versions of the Shutterfly app can be downloaded from the following URLs
https://play.google.com/store/apps/details?id=com.shutterfly
https://itunes.apple.com/us/app/shutterfly-prints-gifts/id309465525 - Coming back to the topic, install the Shutterfly Desktop Uploader once the download is over.
- Now you can easily upload images to Shutterfly and any duplicates will be automatically detected as well as deleted instantly.
Scenario 2: Duplicate Images Across Multiple Albums
The only downside, perhaps, of Shutterfly is its inability to remove duplicate images from the entire account. So if an image has been uploaded in multiple albums, Shutterfly can’t do anything about removing the duplicates of that image. This necessitates an alternative method which can effectively weed out duplicate images without any fuss. Here are the steps that enable you to remove duplicate Shutterfly images by using Clone Files Checker, one of the most popular duplicate cleaning solutions available nowadays.
- Navigate to the Shutterfly image Library by clicking on the following link: https://photos.shutterfly.com/library
- Click Albums to bring up a graphical display of the albums.
- Click on an album to open it. Next, click the number (11 in this case) to select all the images in the album.

- In the right-corner, locate the download symbol and click it to download all the images to your computer.
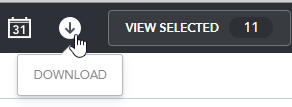
Downloading the images to your computer - Shutterfly will send out a link via email when the download link is available. Therefore make sure the email address used for your Shutterfly account is a valid one.
- Once the download has been completed, repeat these steps for all other albums to save up the images they contain to your computer.
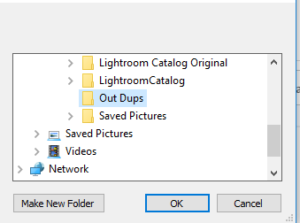
- Now move the entire image collection you downloaded from Shutterfly to a single folder. In this guide, we have named the folder as Out Dups.
- Download and install Clone Files Checker.
- Launch it, and select the Out Dups folder to be scanned for duplicates.
- In the next step, select Custom | Images to narrow the search to images only. However, this step is totally an optional one and opting for the default All Files option will also fetch exactly the same results as by selecting the file type.
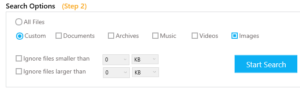
Selecting file types to be scanned - Click Start Search to initiate the scan. Patiently wait for the scan to be over, as it might take a while if the images are really voluminous in number.
- Once the scan is over, Clone Files Checker will throw up a screen informing you about the number of duplicates detected as well as the space they are occupying. Click Review & Fix.
- Now you will see a list of all the duplicates showing up in the user interface. Click the Select Duplicates button and select an option of your liking from the ones that pop out.
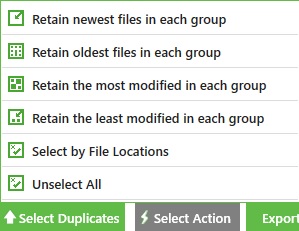
Make your choice - Finally, click Select Action and then select Permanent Delete to get rid of these duplicate images forever.
- Move back to the Shutterfly album list at https://photos.shutterfly.com/library
- Hover the mouse on the Action button on an album and select Delete to erase the entire album. Do this for all the albums.

- Now create new albums to which will take the place of the albums you just deleted.
- Upload the images to the relevant albums from your computer.
- Job done! Your Shutterfly data has been securely purged of all the duplicates.