Windows Photos is one of the widely used applications in Windows to manage and organize photos. It consists of many sophisticated functions that make the entire management process easy, and thus the user doesn’t have to worry for encountering any frustrating moments.
Easily remove duplicate photos from the Photos app in Windows 10
PictureEcho follows Google Software Principles
The Photos app contains a very modern and sleek look, just like with other Microsoft apps. Being a part of the new API allows it to adapt to many newer features, and therefore it’s quite modern, superior in terms of usability, performance and functionalities. However, it still has a couple of problems. One of them is being unable to identify duplicate photos, which is what we are out to address today. This article demonstrates how to identify and weed out duplicate photos from Photos app easily.
Solution
This guide uses PictureEcho for identifying and removing duplicate photos from the Windows Photos app. Go through the following steps in order to eradicate all duplicate photos from Windows Photos app with great ease.
- First of all, the Photos app itself doesn’t store any photo and it basically shows up as a directory of all the photos stored in another location. The photos stored in these locations are scanned, and presented to the user through its interface. So the first step is identifying the locations where photos are stored. Simply open up the Photos app and navigate to Settings.
- In the Settings window, locate the Sources (folders from which the Photos app fetches photos and presents them in it’s interface). Also, the Photos section of OneDrive will also show up its data, if the relevant option is turned on. Note down the paths for later usage. One of the easiest ways to copy the paths is clicking on the path, and then copying the address directly from the address bar when it’s opened in File Explorer/ Windows Explorer.
- Now download and install PictureEcho.
- In the PictureEcho App, locate the Add Path button, and click it to add up all the paths which are being used by the Photos app to fetch images (step # 2).
- Now choose between Exact Match and Similar Match (both of which are sself-explanatory. Select the checkbox for Show preview so that you can see the previews of the photos detected during the scan. Finally go ahead and hit the Start Search button to initiate the search operation.

Selecting the right options and launching the scan - As the scan operation progresses, you will notice duplicates populate the PictureEcho user interface.
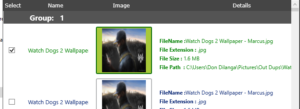
- Use the Select Duplicates button to choose which kind of duplicate images (from every group of duplicates that has been detected) you want to retain All the options in the menu are very easy to understand and require little explanation. Selecting an option reflects the outcome by highlighting the appropriate photos in green. For instance, if you select the Retain bigger image in each group option, all the duplicate images in that group (except the biggest one) will be highlighted in green.


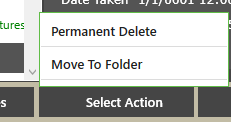
- Click Select Action to execute the final action. You can choose between Permanent Delete and Move to Folder, and as you click your desired option, the resulting action will be performed swiftly.
Selecting the final option - Now close the Photos app, and relaunch it to witness the changes.

