If you’re a photo-lover or a professional photographer, you might have come across the hassle of deleting blurred photos or photos that you clicked by accident. It can be pretty off-putting when you’re organizing or taking a look at your media and obviously wastes a lot of storage. You’ve probably waited for a tool that would accomplish this task of deleting useless pictures for you.
That’s when PictureEcho enters the picture to assist you in identifying blurred photos and eliminating them for good. It is not an ideal tool for deleting duplicate/ visually similar pictures.
Product Spotlight (Duplicate Photos): Use PictureEcho to remove 1000s of duplicate and similar photos.
PictureEcho is made by our company, Sorcim Technologies. It never asks for your email address to install the software. Download and use!
Eliminating Duplicates and Blurry Photos Using PictureEcho
The first step, obviously, is installing the PictureEcho software on your computer which can be easily downloaded from its official website. Thereafter, you must go through the following procedure to use the software.
Step 1: Add Photos to PictureEcho
The top-left corner of the application displays the Add Path option along with the Remove Path option below it. Click the former to be directed to a new window that allows you to browse through your computer files. Select the one which contains photos you want to eliminate. You can also select multiple folders in the same way. To remove any of the selected folders, select it and click Remove Path.
Step 2: Adjust Preferences
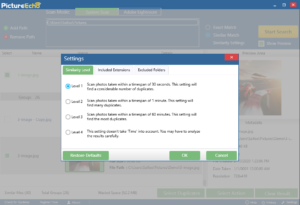
PictureEcho allows you to choose whether you want to scan for duplicate images or similar images. If you choose Similar Match, you can adjust further preferences in the Similarity Settings window.
When you click on Similarity Settings, you are navigated to a new window with the first tab namely Similarity Level. It contains 4 levels, the first being most suitable for identifying blurred and accidental photos that have been clicked within a span of 30 seconds.
Step 3: Start Search
Once you’ve added the folders and adjusted the settings accordingly start the scan by clicking the Start Search option.
Step 4: Select Photos
The result section is displayed in groups of similar/duplicate images. The Select Duplicates option in the bottom-right corner allows you to select duplicates or images in accordance with the size, resolution, date, and location.
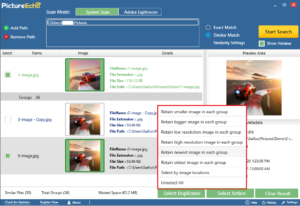
Step 5: Select Action
The final step is the Select Action option that allows you to either delete the selected images or move them to another folder.

Once you have performed the final step as per your preference, you can clear the results to start a new search.
Fixing Blurred Photos
However, if you don’t want to part with the blurred photos and intend to sharpen them you can always use the sharpness tool in Photoshop or Paint. This tool helps adjust the sharpness accordingly and also allows you to shift the focus of the image.
Nevertheless, it’s always better to get rid of the clutter and free up storage space using the simple and flexible PictureEcho app.

